|
Cedar fencing is an extremely popular choice of wood for fencing and also could possibly be the perfect lumber for any fencing projects. Cedar fencing is becoming much more widely used because they are biologically termite repellent additionally they usually do not degrade from wet conditions and also wind. This high quality of theirs tends to make cedar fencing probably the most practical choices for landscape fencing. Cedar fencing is an obviously stylish option for level of privacy and also security. How to Set Fence Posts That Won’t RotHow to install cedar fence posts that last. This photo shows the five ways to make your wooden fence posts last a long time. “Please see an enlargement in additional information below.”
Pick the right posts Don’t use posts that contain sapwood. Instead, use heartwood, because it’s denser and more insect-resistant.
Treat the post with preservatives Soak the bottom of the wooden fence posts in a wood preservative containing copper napthanate, such as Cuprinol.
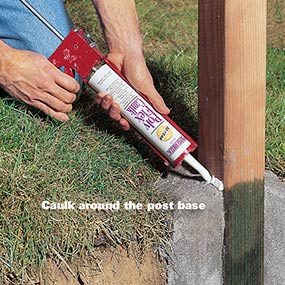
Caulk around the fence post base Apply high-quality exterior acrylic latex caulk, or silicone specifically designed to adhere to concrete to prevent moisture penetration, at the base of the post. If your cedar wooden fence posts are rotting at the bottom, you need to replace them. The rot probably developed because the posts were installed improperly. So if you install your new posts the same way the old posts were installed, you’ll just have to do the whole thing over again a few years down the line. Cedar has a reputation for durability, but unless a few guidelines are followed, cedar posts can fail in as few as five years. Three factors contribute to this early failure: poor drainage, low-quality wood and poor protection against insect damage. To get the most out of your new posts, here are five things you can do: 1. Soak the bottom of the posts in a wood preservative containing copper napthanate, such as Cuprinol. Available at some paint stores and home centers, this wood treatment is specifically designed for in-ground applications. 2. Place about 6 in. of aggregate in the bottom of the posthole to allow for drainage. The bottom of the post should extend a few inches into the aggregate as shown. 3. Pour the concrete so that it’s above the soil level. Trowel the top smooth and slope it so that water runs away from the post. 4. Apply high-quality exterior acrylic latex caulk, or silicone specifically designed to adhere to concrete, at the base of the post. This will seal the gap between the concrete and post that’s caused by freeze/thaw cycles. 5. Don’t use posts that contain sapwood. Sapwood is lighter in color (usually yellow) than heartwood, which is dark. Instead, use heartwood, because it’s denser and more insect-resistant. Additional Information Anatomy of a long-lasting fence post Required Tools for this Project Have the necessary tools for this DIY wooden fence post project lined up before you start—you’ll save time and frustration. BucketCaulk gunPaintbrushPosthole diggerShovelTrowelWheelbarrow Required Materials for this Wooden Fence Post Project Avoid last-minute shopping trips by having all your materials ready ahead of time. Here’s a list. AggregateCementExterior acrylic latex caulkWood preservative Wood rot always starts with a source of water, if only just a slight dribble during a hard rain, contacting raw wood. Starting with the best water resistant woods is the best practice. We see the lack proper protection from wood rot from water penetration all too often. If you have moisture damaged wood in your home, give us a call. Water Damage Restoration Pros – Orange County
from http://waterdamagerestorationpros.net/blog/how-to-protect-your-fence-posts-from-water-damage/
0 Comments
Leave a Reply. |
About UsWhether your property’s water damage resulted from storm flooding, a broken water or sewage pipe, or from a fire, we can manage all of your requirements correctly and appropriately. Our skilled technicians can assist in drying any type of water and flood clean-up. Also, we've got all of the required tracking tools that will discover the presence of wetness or mold, even if it is behind walls, under flooring, or elsewhere. We make certain that your property is restored to a safe and sound condition. ArchivesNo Archives Categories |
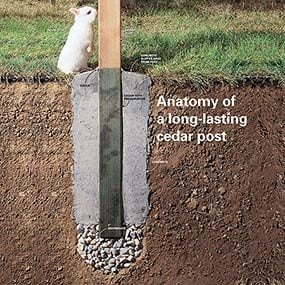 Anatomy of a long-lasting fence post
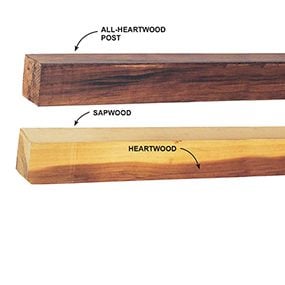

 RSS Feed
